Thursday, June 28, 2012

Wedding Heart Specimen Art


My little sister just got married! We had a great time at her bridal shower and lots of fun prepping for her wedding. I wanted to make a gift that would be personal to her and her new husband so I decided to make some art for their new, cozy, little bungalow.
They met in upstate New York so I started with a map from the area. I cut a slew of hearts with my Cricut (the Create a Critter cartridge).

Then I created a text box in Publisher. I typed in the text I wanted (2 Bible verses: "For where you go, I will go... your people shall be my people, and your God, my God" Ruth 1:16  and "I am my beloved's and my beloved is mine." Song of Solomon 6:3) with some cool fonts. I like the juxtaposition of the more classic typewriter font with the scripty font.
I also inserted super tiny, super light gray dots in the textbox to be a template to place the hearts.
I printed my text on white cardstock and then trimmed them to fit the frames.

Next came the hard part.... picking the best hearts and placing them. On the 'beloved' print, I kept the hearts mostly white. I picked out the one of the town where they met and married, which just happens to be in the very green Adirondacks, and put that on as an accent.
The other print, I went with more of a mix of colors. Still very muted, lots of white, green, and a pinch of blue.
And that's about it. I wanted it to be nice so I didn't do my usual rush job. I actually took my time and was super picky about lining up the hearts and removing extra adhesive tape bits. I even washed the frame glass on both sides! :) I think they turned out pretty nice. I might have to make some for me!

Linking up to these great blog parties:
Sunday: Sunday Showcase at Under the Table and Dreaming; Show Me What Ya Got at Not Just a Housewife;
Tuesday: One Project at a Time at A Bowl Full of Lemons; Tuesday's Treasures at My Uncommon Slice of Suburbia;
Wednesday: Wicked Awesome Wednesday at Handy Man, Crafty Woman; It's Overflowing at Overflowing with Creativity; Whatever Goes Wednesday at Someday Crafts;
Home Decor & Organizing at Organize and Decorate Everything;
Thursday: Delightfully Inspiring Thursday at Delightful Order; Thrifty Thursday at Thrifty and Fabuless;  Transformation Thursday at The Shabby Creek Cottage;
Friday: Frugal Friday at The Shabby Nest; Flaunt it Friday at Chic on a Shoestring;

Monday, June 25, 2012

Make a Card Monday - Have a Ball

Making boy cards can be difficult especially when they start to hit the tween/teen years. You don't want something super grown-up but a lot of boy images can be too babyish. The stamps I picked for this card bridge that gap.
I used some Arctic Frog (I think) paper that I had in my stash from a CK convention ages ago. It has a great color scheme and hip circle pattern that I think the young man receiving this card will like.
The sentiment on the front reads, "It's your day." The inside says, "So have a ball." Get it? It's punny. :)


Details:
cardstock: Georgia Pacific (white), unknown (blue and orange)
patterned paper: Arctic Frog (circle and stripe)

color: Palette Prussian Blue ink
stamps: TAC Sportz Words and Boyz at Play

Friday, June 22, 2012

Meet the Hydrangeas and Harmony Ensemble

I respectfully ask that you not pin pictures of my children to Pinterest. Thank you!
 I've been thinking that it might be good to give us all blog names so that I can talk about the fam without giving out too much personal info. A lot of strictly homeschool blogs do this, and it's always fun to see why the folks are nicknamed the way they are. So in that vein, here's the Hydrangeas and Harmony Ensemble:
Keeping with our music theme (since we're kind of a musical family and I'm totally a music person):
Alto (that's me)
 
I sing alto in church or with groups although I'm really a mezzo-soprano. Technically my range is considered dramatic soprano but I'm not sure I like the sound of being dramatic. I'm not a drama queen. I mean who said I was? I don't get all like 'Wha-ut?' and stuff. *sniff* Really! (Did you catch all the sarcasm there??) I think I'll stick with being an alto. :) I'm the one who keeps things going. The organizer, the home manager, the teacher, the helper.


Bass (that's the hubs)

He actually sings bass so this is fitting for him. He's also the base of our family. The rock. The strength. The one who holds it all together. He's the fun parent and a seriously hard worker. He's a good provider and the support for the whole fam. Appropriate name, right?

Tenor (that's the son)
He's so much like Bass and yet so much like me. It's funny to see how God takes two totally different people and mushes them up into their offspring. And yet, Tenor is his own person. He adds a counter melody in our home with his personality. He's funny, analytical, and a really deep thinker. He definitely keeps me on my toes. Without his harmony, we'd have a hole.

Soprano (that's the daughter)
Considering all her stories and imaginings, she could be a lyric soprano. :) She's all sunshine and light and happiness. She loves animals and people and has a depth of compassion in her soul. She'll tell you that she just loves love! Her personality comes out in the funny things she says which make us laugh 'til we cry. She is our joyful melody!

That's the ensemble.
 

Thursday, June 21, 2012

Angry Birds 10th Birthday Party

I respectfully ask that you not pin pictures of my children to Pinterest. Thank you!
 We've talked for a couple years now about having a big 'friend' party for Tenor's 10th birthday. We did a big party for his 1st birthday but all the other years, we just got together with the grandparents and aunts and uncles to celebrate. He's really been looking forward to a 'friends' party for awhile. But while we've talked about it for several years, I did not have my act together this year to spend months and months planning and prepping. :) We had to finish our school year, do our homeschool evaluation, my mother-in-law was with us for a visit, my sister was getting married, and we were headed to the beach! We were swamped!
All of a sudden we realized that to fit a party in pronto! That night, we decided to have the party in 2 weeks.  It was a toss-up between a Lego party or an Angry Birds party because both are huge hits in our house right now. The game ideas I saw online totally swayed us to do Angry Birds though.

Using some ideas I had already pinned and some super speedy internet and Pinterest searches, we came up with a game plan. I quick made invites using this neat (and free!!!) party printable set.
I popped the background image into Publisher, installed the Angry Bird font, and just added the pertinent info. We mailed them out the next day.

Then it was time for decor ideas:
Since the party would be boys from the ages of 7-11, I tried to keep it simple. :)

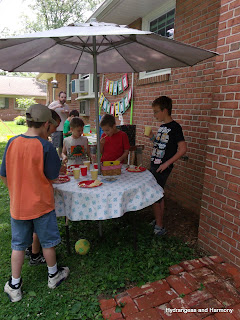
I printed the bird faces from The Party Animal, cut them out, and stuck them on the day of the party. I used old formula cans covered with green construction paper to hold straws ($1 at Michaels) and flatware (Dollar Tree). I found a pig face clip art online and printed up a ton of them for different things. I cut 'em out and stuck one on each can.
I printed the banner letters from The Party Animal. The 'appy' birthday idea was clever but we weren't sure the kids would get it. So When we printed it, I just printed an extra 'h'. To add color, I taped them on bright 8.5x11 pieces of cardstock. We strung them with yellow curling ribbon I had in my stash and attached them our badminton net poles. We splurged a bit on a pig tablecloth and bird napkins from Oriental Trading. We saved money by getting plain red plates and plain red and yellow cups from the dollar store.
I made a cute tissue paper red bird "wreath" that we hung on a stake in the front yard but I forgot to take pics. It looked kind of like this pig one.
That was it for decor. Not too bad. :)
We kept the snacks pretty simple too:
water and lemonade, chips, pretzel fish, and baby carrots, 2 flavors of ice cream, and angry bird cupcakes. I saw some online that looked super cute so I had to copy them. The hardest part of making the cupcakes was digging the exact amount of colored jelly beans out of the Jelly Belly dispenser at the grocery store. Those big plastic scoops are a little awkward when you're trying to get 1 more blue bean!


Favor bags included an Angry Birds eraser, a sheet of Angry Bird stickers, a bag of Angry Birds gummy candies, a slingshot, and 6 mini porcupine balls. I got plain red lunch bags at the craft store and then printed extra red bird faces from here. They turned out cute, kind of like these.

Next up, the most important part of the party... games!
We had a can toss game like here. (With more formula cans and pig faces.We borrowed the angry bird dog toys from my folks who had just purchased them the previous week for their doggy.)


We clipped a bunch of green balloons (also with printed pig faces) onto our laundry line with clothespins (like here). We had a basket of wooden handled slingshots and mini porcupine balls for the boys to shoot the balloons. (The tarp was to keep too many balls from getting lost in our firewood stacks.) Later the slingshots and balls went into the favor bags for the guests to keep.
I printed more pig faces and made up some point values using the Angry Birds font and taped them into our old living room window (that was sitting in the trash pile). The boys used suction dart guns to shoot at the pigs and point values.

On the driveway, I set up our giant bowling set (complete with a red bird face taped on the red bowling ball.) I forgot to get a picture of it though. You could do something like this if you don't have a bowling game handy.

We set up ladderball but it didn't get much use.

 Mainly because we had this....
 
Yup... Bass built a 5' slingshot with 2x4s and a beach water balloon launcher and some cable ties. I saw an idea online that he worked off of. It was kind of a MacGyver project but we tested it so that it would be sturdy and safe. The boys had a blast trying to knock down a stack of boxes and some pigs (more formula cans.) I found mini kickballs at the dollar store which worked great.

Even some of the moms gave it a try at pick-up time.
More party shots:
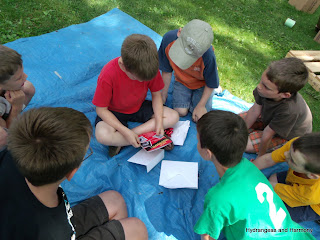
Introducing everyone
Snacks
Singing to the birthday boy
Present Time
 The best part.... a very happy 10 year old!

Linking up to these great blog parties:
Sunday: Sunday Showcase at Under the Table and Dreaming; Show Me What Ya Got at Not Just a Housewife;
Tuesday: One Project at a Time at A Bowl Full of Lemons; Tuesday's Treasures at My Uncommon Slice of Suburbia;
Wednesday: Wicked Awesome Wednesday at Handy Man, Crafty Woman; It's Overflowing at Overflowing with Creativity; Whatever Goes Wednesday at Someday Crafts;
Home Decor & Organizing at Organize and Decorate Everything;
Thursday: Delightfully Inspiring Thursday at Delightful Order; Thrifty Thursday at Thrifty and Fabuless;  Transformation Thursday at The Shabby Creek Cottage;
Friday: Frugal Friday at The Shabby Nest; Flaunt it Friday at Chic on a Shoestring;

Monday, June 18, 2012

Make a Card Monday - Teddy Bear Bookmark


This is a great way to send a card and a small gift at the same time. I made the card base as usual. To create a pocket, I cut some clear vellum and stapled it to an A2 size piece of cardstock. I glued that piece to the front of my card base (which hides all the staple backs.)

Then I stamped a sweet bear image and sentiment and matted it with 2 layers of cardstock. I tore the first mat and lightly sanded the bookmark base. A quick hole punch and some ribbon makes it into a bookmark.
To mail, just slip the bookmark into the vellum pocket. Another easy-peasy, lemon squeezy card!


Details:
cardstock: Georgia Pacific (white), DCWV (card mat and base; bookmark base)

embellishments: Making Memories staples, ribbon (unknown)
color: Palette Cognac ink, Prismacolor watercolor pencils, Pebbles chalks
stamps: TAC Teddy Bear Picnic

Monday, June 11, 2012

Make a Card Monday - Wedding Wishes

 
Love is in the air. My little sister is getting married so I was inspired to make a cute wedding card. I think it could work for an anniversary too. The card base is a DCWV embossed A2 size card. In the center there was a little blank square perfect for this cute cake and happy couple. A bit of Stickles adds just the right amount of sparkle for this simple and sweet wedding card.

Details:
card base: DCWV
embellishments: Stickles
color: Palette Belle Rose ink, Tombow markers
stamps: TAC Wedding Wishes

Monday, June 4, 2012

Make a Card Monday - Road to a Friend's

This is one of my favorite images to create a 'thanks for your hospitality' card. There's nothing better than enjoying the wonderful hospitality of a good friend.


Details:
cardstock: Georgia Pacific (white), unknown (red mat)
patterned paper: DCWV (layer and strip)

color: Palette Noir ink, Le Plume and Tombow markers
stamps: TAC Road to a Friends
Related Posts Plugin for WordPress, Blogger...