Showing posts with label Kitchen. Show all posts

Wednesday, March 15, 2017

Cocoa and Tea Station

It's getting a little late in the year to share this project I put together but we live in the mid-Atlantic area. Our groundhog doesn't always get it right. :)
Since, despite some warmer temps for a couple weeks, we're still living in chilly weather, we're still enjoying the cocoa and tea station I put together.

After trying every possible home decor and website, I finally found a tiered tray that was close to what I envisioned. This one from Wayfair.com was also in my budget. We had the white mugs on-hand as well as the Mason jar. I found the canisters for the cocoa mix and marshmallows at Home Goods and the cute bowls holding the hot chocolate packets and tea bags at TJ Maxx.
I moved the baking spice spinner rack temporarily and set our little station up on the baking table. Just steps away from the kettle and microwave. :)
Anyone care for a cuppa?


Linking up to some or all of these great blog parties:
Sunday: It's Overflowing; 
Monday: Inspire Me Monday at Sand and Sisal; Tutorials and Tips at Home Stories A to Z; Monthly Before and After at Thrifty Decor Chick; The Scoop at Worthing Court
Wednesday: Wicked Awesome Wednesday at Handy Man, Crafty Woman;
Friday: Frugal Friday at The Shabby Nest; Flaunt it Friday at Chic on a Shoestring;

Come follow me on Instagram for more house renos and decorating projects!

Tuesday, February 2, 2016

A Non-Coach 21 Day Fix Review

For the past few years I've experienced some health issues... nothing terrible, just inconvenient and making me feel less than 100%. However over the past year I feel like I've been getting worse. After denial, denial, and a little more denial, I finally decided I should probably go to the doctor and get a complete physical and have everything tested.
Of course by the time I got around to actually opting to do it, I needed to wait two and a half months before our health insurance funds would be available for the new year.

In the meantime, I "stumbled" across a couple of articles online. (Stumbled is in quotes because I know nothing ever happens by coincidence. I know God was leading me to read those articles. Why else would I have clicked on something about a Paleo diet? My diet is more 'unsupervised child at a birthday party'.) I got info on how a Paleo diet can help autoimmune disease (*ding, ding* that's me), how much sugar affects our bodies (*ding, ding* that's me too), and what adrenal fatigue looks like (*ding, ding* that's kinda like me; yikes!), and how our diets can influence all of that. So, um, looks like I need to change what I eat.

I knew that my personality needed a plan to work off, especially being so addicted to sugar. God brought to mind a friend who had had great results with 21 Day Fix. Lightbulb. (God led me to that too. I'm not that smart on my own. lol) I got in touch with her and found out she was planning to start the second week of January. Perfect.

I got the program with the containers and was all excited
 
until I saw the size of the yellow container (starch aka bread, rice, crackers, oatmeal, yummy things that I love, even my fav veggies -- peas and sweet potatoes)
(It's not that bad though, honest!) After I read through everything, I immediately began pinning a million things on Pinterest, and then putting together a binder with all the info and recipes I'd need. Planning is essential with this program.
Here's what my binder looks like:
Front cover with Phil. 4:13 "I can do all things through Christ Who gives me strength."
The first page is my menu plan for the week. I made a template in Word that I can print each week to plan my food.
Next up is a great cheat sheet from Pinterest on container sizes. It's helpful when bulk meal prepping or if your container is in use or needs to be washed.
Next up a food list (I needed to add a few things to it since my version of 21 Day Fix is newer than the one used to make this) and a measurements tracker. Both found here.
And a 4-up daily tracker for the 1200-1499 calorie range. (Found here. I might go with a smaller version that fits more days on a page down the road.)
Using cardstock and the bread tab Stampin Up punch, I made dividers for the daily tracking forms and my recipe categories (breakfast & bread, dinner, lunch, veggies & sides, desserts & shakeology)
 and dividers within categories if needed.
Then I printed off a ton of recipes from Pinterest and websites that I got via Pinterest. (I copied them and put them into Word to format them consistently. That's just my OCD at work and totally not necessary to do.) :)
Obviously the planning and printing are much easier than the actual eating and exercising. :)
Meal Prep for week 1:
 Mexican Taco Salad for lunch (so much food!) (1 red, 2 green, 1 blue, 1 orange):
My first homemade marinara (so sad considering I'm almost 40 and Italian. Sorry, Nonna).
 
Round 2 (Week 4) meal prep (breakfast, lunch, some snacks):

Some tips that might be helpful to you:
Find recipes ahead of time
Meal plan ahead of time (Keep it simple. I eat the same thing for breakfast every day and alternate 4 lunches. Dinners are where I change things up.)
Only buy the groceries you need for that week if you need to really redo your pantry (I found a lot of things at Aldi's but my pantry is rather unhealthy. I can only get what I need each week to start building up a better pantry because of the budget. No huge $500 trip to Whole Foods for us. :) )
Plan to do this for the long haul; don't quit after your 21 days are over
Don't include your family's food the first round (It's easier to just cook for them like you normally would until you figure yourself out. Plus they can 'eat down' the pantry. Sorry, fam!) :)
Get mason jars for salad (keeps it crisp!) and containers for portioning (I liked these Glad containers: rectangle and round)

My review:
After round 1, I've lost 4 lbs. and 9 inches. I did't really need to lose weight so this is great progress for me. I do need to seriously tone up though. 21 Days later, I'm starting to see a vee in my abs. Never had that before. :) I haven't exercised in over a year (#embarrassing) so for my first round I modified everything. There is a person in the DVDs to follow if you need to modify. Until I feel strong enough, I'll continue to modify with her.

The workouts are quick but get results. (See above.) I can definitely feel it every day. The DVDs aren't annoying. Yeah, you know what I mean. 21 Day Fix isn't like those.
I already had a mat and some weights so there was no additional expense for me there. You can always start with soup cans as weights if you need.

There is plenty of food to eat, even at the lowest calorie level. If you need to lose a lot of weight, you might feel hungry. Talk to your coach about possibly bumping up your calorie level for awhile. I find that I need to eat eggs for breakfast to give me enough energy for my morning workout. And if I do two workouts in one day (like they suggest for week 3), I'm absolutely starving. 
I didn't use Shakeology but picked a different protein shake meal replacement powder. That's completely up to you. If you can't afford it, don't do it. We weren't really meant to drink our food on a long-term basis. Take a multi-vitamin and eat your containers of food instead. 
It does help to spread your reds out over the day to keep your energy level on an even keel.

I treated my first round as a no pressure try-out. Lots of grace for realizing I forgot things at the grocery store, lots of grace for learning what I need to eat when, lots of grace for realizing I put the food into the wrong container and that teaspoons are not for Stevia, lots of grace for the workouts, some grace for failed recipes. It takes time to get into a groove with it. At the beginning of week 4, it's starting to feel more natural... now I'm incorporating the family's food.
I have more energy, my skin is clearing up, I feel stronger and have less back pain, I haven't had a thryoid-induced hot flash, and my digestive issues have mostly disappeared. Yay! This is definitely the right road to be headed down.

Beachbody does have a 'rah rah, go team' kinda vibe sometimes but, in this instance, it's well earned. 21 Day Fix works. It's not just a diet; it really is a sustainable change in lifestyle.

My 11-year old daughter (who squeals the words 'sugar' and 'chocolate' with glee --- seriously; no joke --- and eats like me --- kinda picky, lots of carbs) was very skeptical about this. She followed me around for about 3 weeks asking a ton of questions about it. She implied that she didn't want any part of it. Three weeks later, she's working out with me every day, willing to change her breakfast choices (to not just cereal), and liking most of the dinners I've made for the family. If I can keep the youngling and padawan from suffering health-wise like I have, then this program will be more than worth it for the results I've already gotten.

I hope that helps you! If you're interested, let me know. I'm happy to answer questions or point you to a great coach. Be healthy (and eat black bean brownies)!

Linking up to some or all of these great blog parties:
Sunday: It's Overflowing; 
Monday: Inspire Me Monday at Sand and Sisal; Tutorials and Tips at Home Stories A to Z; Monthly Before and After at Thrifty Decor Chick
Wednesday: Wicked Awesome Wednesday at Handy Man, Crafty Woman; Whatever Goes Wednesday at Someday Crafts; 
Friday: Frugal Friday at The Shabby Nest; Flaunt it Friday at Chic on a Shoestring; Friday Finds at Craftaholics Anonymous

Thursday, June 19, 2014

Acoustic Guitar Cake

 
I respectfully ask that you not pin pictures of my children to Pinterest. Thank you!

Tenor's birthday is just a few days after Soprano's fortunately, this year, we only had one friend party to host. For Tenor, we had decided to get him an acoustic guitar this year as his big gift. What better cake to celebrate with than my Wilton guitar cake? My mother-in-law had given me this pan years ago, and I never had occasion to use it. I had to find the directions online but it was super easy to find and print the instructions for an acoustic guitar.
Other than trying to get really black icing (ugh!) and the weather being so hot the icing practically melted onto the cake, the whole thing came together easily. Happy Birthday!


Saturday, December 21, 2013

12 Days of Christmas Traditions: Pizzelles


Another yummy tradition, we like to have each Christmas are Italian cookies called Pizzelles. My mom usually makes these each year but I thought it was time I put my Pizzelle iron to use. It's been sitting in my appliance graveyard for about 7 years.
Just doing my part to keep the family recipes alive.
Want to make your own? Here's how:
Ingredients:
6 eggs
1 1/2 cups sugar
1 cup margarine (cooled and melted)
1 1/2 tsp anise
scant Tbsp vanilla
   *My mom uses a tbsp of anise and a tbsp of vanilla. You can also make them without the anise if you don't like that flavor. They're not quite the same though.

Mix in:
3 1/2 cups flour
2 tsp baking powder

Directions:
Oil iron to start.
Batter will sticky enough to drop by spoon; drop a scant tsp on hot iron for 30 seconds.
Clip iron for thinner cookies.
    *You can let them cool flat or while they're warm you can roll them (like a cannoli shell). They taste great sprinkled with powdered sugar.

Makes approximately 60 cookies. Enjoy!

Check out all our family Christmas traditions:
Christmas Cards
Advent Calendar
Christmas Books and DVDs
Christmas Music
Caramels
A Special Nativity Scene
Ornament Tree
Pizzelles
4 Stocking Gifts
3 Under the Tree Gifts
Christmas Eve Church Service
Christmas Morning - Luke 2 

Sunday, November 24, 2013

Meal Planning System Update & Easy Spaghetti

Way back at the beginning of the year, I posted about my pick-a-card meal planning system.
It is actually the first system that I have stuck with for more than a few months. It's been really great for us---helpful with budgeting, helpful with grocery shopping, helpful with actually getting a decent meal on the table.
Tenor either trying to help me or comment on my cooking by changing the whole week to Eat Out or Left Overs.
I wanted to do a quick update to say that yes, it does work! I've needed to tweak it just a bit though and thought I'd share.
Our schedule had changed this fall when our homeschool co-op began meeting again. That made both Wednesday nights (worship team rehearsal at church) and Thursday nights (wiped out after co-op) harder to make a full meal. We also reevaulated our budget and decided to cut back on expenses to try to get a little more into the savings account and to increase our tithe. I was also finding that we had way too many left overs so I didn't need to cook full meals 5 nights a week.
To have our dinner plans reflect a little less time mid-week and a little less available money, I changed my header cards.
Now we do
Pasta on Monday
Chicken on Tuesday
Easy Meals on Wednesday
Left-Overs on Thursday
Pork or Beef on Fridays
and
Left-Overs again on the weekends.

Changing up the cards was super easy and can be shuffled again if we need.

In a comment in my original post, someone asked about me sharing recipes for some of my go-to dinners so I figured I'd try to start posting those too. All my dinners are easy-peasy, not time intensive, and honestly, probably a little boring. But they fill us up, generally don't garner any complaints, and help me get food on the table. :)

Here's a pasta dish we enjoy (I use either Ziti or Penne noodles):


Ziti Bake                                                   Serves 8-10
Preheat oven to 350 degrees.                                              Prep time 20 min; Total time: 20 min.

Ingredients:
1 16oz pkg Ziti noodles

1 lb. ground beef
1 15 oz carton Ricotta cheese
¼ C Parmesan cheese
¼ C chopped parsley
1 egg, slightly beaten
¾ tsp. pepper
2 15oz jars spaghetti sauce
1 8oz pkg Mozzarella cheese, shredded

Directions:

1. Cook Ziti noodles; drain; set aside.
2. Brown hamburger and then combine with Ricotta cheese, Parmesan cheese, parsley, egg, pepper, and half the spaghetti sauce.
3. Add Ziti and toss gently to coat well..
4. Spoon into a 13”x9” baking pan.
5. Pour remaining sauce evenly over pasta and sprinkle with Mozzarella cheese.
6. Bake for 20 minutes or until hot and bubbly.


Thursday, January 3, 2013

Meal Planning Made Easy - Pick a Card

Meal planning is truly the bane of my housewife existence. Ugh! I can cook but it's not my favorite thing so I try to put off the 'what's for dinner' question as long as I possibly can. However, five o'clock keeps rolling around.
The few times I've attempted meal planning things have gone really well and I loved it... while I kept up with it. I tried and liked the 5 dinners in 1 hour program, the once-a-month cooking thing, just making meal plans in Publisher, crock-potting everything but I haven't found a system that I could continue with for more than a few months at a time. I've come up with something new though. I'm hoping this will do the trick.


A friend shared an idea that had been given to her about making each night of the week a particular type of meal so that you don't really need to think about what you're going to make. Ex. Always serve chicken on Thursdays or have Meatless Mondays. Using that idea and keeping our weekly schedule in mind, I came up with Pasta on Mondays, Chicken on Tuesdays, Beef on Wednesdays, an easy meal on Thursdays, Pork or Fish on Fridays, and easy meals or left-overs on the weekends.
Pasta on Mondays (brown), Chicken on Tuesdays (yellow), Beef on Wednesdays (green), Easy Meals on Thursdays (white), Pork or Fish on Fridays (blue), and Easy Meals or Left-Overs on the weekend (white)
The next step was to go through my recipe box and list my go-to favorite (family tested and approved) recipes. I made a template in Word for 2" boxes. Then I typed in the name of all the meals that I make on a regular basis. Since I'm a visual person, I assigned a color to each meal category. I printed the category name and the meal cards on the same color of cardstock. I printed lots of extra left-over cards (and a few eat out cards.)

After trimming them to 2" square, they fit perfectly in a pocket chart. I originally had gotten it from the Target dollar spot. I had picked up two pocket charts for our homeschool room but we ended up not really needing both.

I tucked in my days of the week cards and then put the corresponding meal category card in the next slot down. Below that, I put one meal card in for each day of the month.
All of my extra meal cards go in the bottom slot. Now when the new month rolls around, I can quickly rotate my meal cards which will hopefully give us more variety in our dinners.

My new menu planner hangs out near our laundry room Command Central (right off the kitchen.) It's on the back of the door between the laundry and the kitchen so it's totally accessible but can be hidden away just by opening the door. Our calendar is there too so while I'm planning out meals, I can see at a glance if we have a busy night that might need an easier dinner or if we're having company or if we're going to be company somewhere.

Here's hoping this is the solution for my meal planning frustration!


Linking up to these great blog parties:
Sunday: Sunday Showcase at Under the Table and Dreaming; 
Tuesday: One Project at a Time at A Bowl Full of Lemons; Tutes and Tips at Home Stories A to Z; Show Me What Ya Got at Not Just a Housewife;
Wednesday: Wicked Awesome Wednesday at Handy Man, Crafty Woman; It's Overflowing at Overflowing with Creativity; Whatever Goes Wednesday at Someday Crafts;
Home Decor and Organizing at Organize and Decorate Everything;
Thursday: Delightfully Inspiring Thursday at Delightful Order; Transformation Thursday at The Shabby Creek Cottage;
Friday: Frugal Friday at The Shabby Nest; Flaunt it Friday at Chic on a Shoestring;

Thursday, August 30, 2012

Gray Cottage Kitchen Reveal

It was a long time coming... a kitchen face-lift! I'll try to let the pics do the talking on this one.
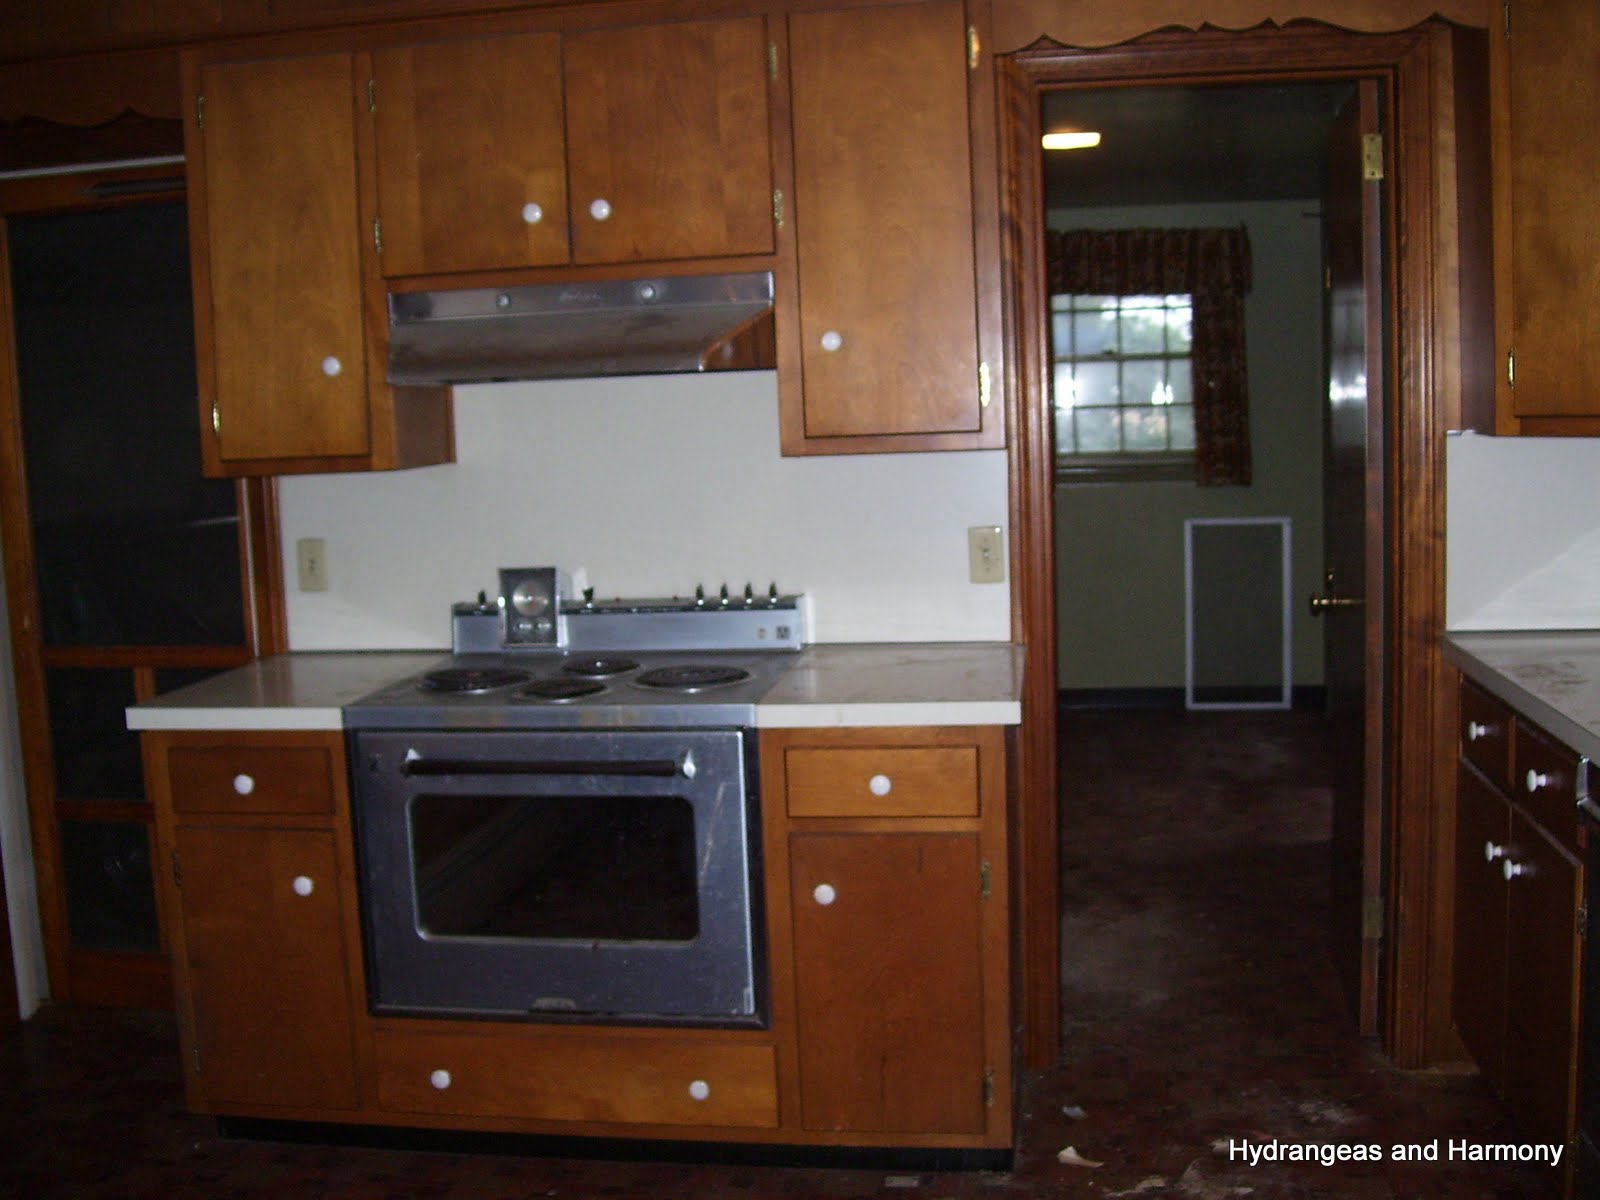
Here's what we started with
lots of dark cabinets,
old wallpaper,
paneling,
a leaky sink faucet,
scuzzy, crusty countertops,
a really, really nasty linoleum floor with weird burn spots or something on it,
a leaky dishwasher,
and an oven that was hardwired to 100amp and connected with electrical tape.
There was also a funky kinda smell going on in there.
And of course, we have the "Narnia" lamp.


Looking towards the dining room.
Looking towards the garage (on the left) and the laundry (on the right). See the weird coloration near and in the laundry room... the floor there was eaten or burnt away to the under-layer of the linoleum.


When we moved, my sister cleaned all of the cabinets out for us. Before I put anything away, I scrubbed them down again and laid down new shelf paper. Then I tried to wipe down the grimy wallpaper. Big mistake. It started disintegrating right off the wall. This is what it looked like after 2 days of "washing" and scraping...
(Oh, we also had this weird built in light cornice thing on the wall opposite the sink.)

More wallpaper removal and you can see tape at the ceiling for painting:

After all the washing, I painted the walls Misty Surf by Valspar.
Before we went any further, a friend came and installed a new floating linoleum tile floor for us. He also helped us immensely by installing a new dishwasher and redoing all of the sink plumbing. At that point, I started letting the kids take their shoes off in the house. Yeah... it was that bad. Ugh!

We removed the 'cornice' light and installed these cabinets from the Re-Store for extra food storage. They act as a pantry space for us.

The next step in this process was to remove the paneling. Bass carefully peeled off a little section next to the door to the basement to see what condition the walls might be in... it looked good so a few hours later we were paneling free (at least in the kitchen.) A day or two of putty and sanding and then I could paint with the same Misty Surf color. Here's what that same wall looks like:


The next thing we tackled was the removal of the Narnia lamp. We were going to cut back the weird half-wall but the baseboard radiators create some difficulties there. For the time being, we're going to keep that wall as is. Bass did have to build out a header because the original molding went all the way up to the ceiling.

This spring, we tackled the next big change... painting all of the trim and woodwork and cabinets. We can't swing a total gut job at this point but figured that $50 worth of paint could make enough of a difference that I would be able to live with the existing kitchen for a few more years.
The soffit, doors, and trim now all match the rest of the house (Crumb Cookie by Olympic). I wanted to lighten up the kitchen but still have contrast with the light trim and counter-tops so I chose a greige color. I painted the cabinet hinges with a spray paint that matches the cabinet doors. We got black drawer pulls for the drawers and simply spray painted the old white knobs with black. Bass did fill and re-drill the knob holes to put them in a better position. It took almost 3 weeks of daily painting but we did it.
I painted the previously gold frame on this picture black to match the space better.
I covered foam board with pretty scrapbook paper to create a faux back for this niche. It sits in front of the microwave hood plug to hide it. I'd like to collect some more white creamers to add to my collection.
New clean stove and microwave. Bass had to cut out the cabinet below the old drop-in stove to make our freestanding unit fit. He also removed an entire cabinet above the old stove hood to make room for the microwave. He used the wood from the old cabinet to face the shelf he installed to support the new micro-hood.

New light fixture to replace the old 'in-the-ceiling' square light thing.


Kitchen valance 

The view from the dining room...
One last before and after:


We're loving the lighter, more cottage-y look. Well, I'm loving the new look. Bass is just loving the happier wife. :) Next year we hope to maybe redo the back-splash and paint the counter-top. Until then, I'm enjoying it!


Linking up to these great blog parties:
Sunday: Sunday Showcase at Under the Table and Dreaming; 
Tuesday: One Project at a Time at A Bowl Full of Lemons; Tutes and Tips at Home Stories A to Z; Show Me What Ya Got at Not Just a Housewife;
Wednesday: Wicked Awesome Wednesday at Handy Man, Crafty Woman; It's Overflowing at Overflowing with Creativity; Whatever Goes Wednesday at Someday Crafts;
Home Decor and Organizing at Organize and Decorate Everything;
Thursday: Delightfully Inspiring Thursday at Delightful Order; Transformation Thursday at The Shabby Creek Cottage;
Friday: Frugal Friday at The Shabby Nest; Flaunt it Friday at Chic on a Shoestring;
Related Posts Plugin for WordPress, Blogger...